Administration Guides
Connect to Keycloak
To connect to the console, two scenarios are possible:
- This is your first connection
- Your personal system access account has been authorized to connect
With your personal account, you simply enter your credentials. If this is your first connection, you must retrieve the credentials stored in a Kubernetes secret within Rancher. Once connected to the Rancher console:
- Filter the
kosmos-iamnamespace - Go to the
Storage > Secretsmenu
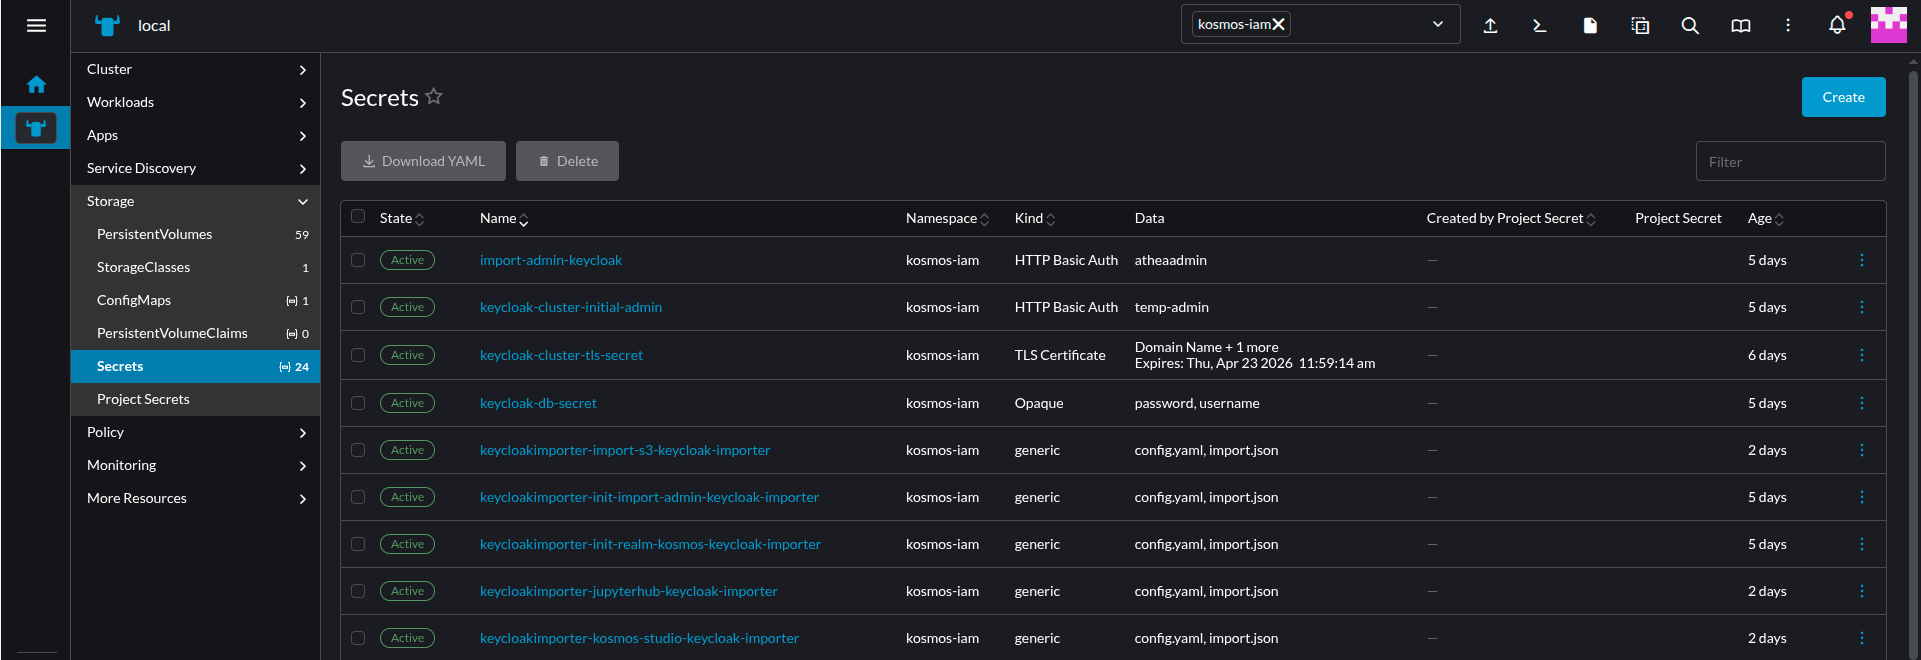
- Click on the
keycloak-cluster-initial-adminfield - The window that appears allows you to retrieve the login credentials for the Keycloak console

Configure User Federation
Keycloak needs the signing root CA used to sign the LDAP certificate
Get the root signing CA and verify the signature chain cryptographically
Without an intermediate CA:
openssl verify -CAfile root-ca.pem ldap-server-cert.pem
With an intermediate CA:
openssl verify -CAfile root-ca.pem -untrusted intermediate-ca.pem ldap-server-cert.pem
Expected result: ldap-server-cert.pem: OK
Create a secret with the signing root CA used to sign the LDAP certificate
apiVersion: v1
kind: Secret
metadata:
  name: pf-ca-chain-secret
  namespace: kosmos-system-restricted
data:
  ca.crt: xxxxxxxxx
Configure the truststore value with this secret
The above secret must be used as a truststore value for the keycloak-cluster:
keycloak:
  truststores:
    pf-ca: ref+k8s://v1/Secret/kosmos-system-restricted/pf-ca-chain-secret/ca.crt
Configure LDAP connection
Connect to keycloak.
- Click on
User federation - Click on
Add LDAP provider - Set a
Display Name - Choose your LDAP implementation in
Vendor:Active Directoryfor Active Directory,Otherfor OpenLDAP, etc. Form will be completed depending on you selection. - Set your LDAP url in
Connection URL. For LDAPS, the port number is 636 . - Enable StartTLS:
OFF - Use Trustore SPI:
Always - Connection pooling:
ON - Connection timeout: leave empty
- Click on
Test connectionto check - Keep
Bind typeto simple - Set the
Bind DNwhich will allow keycloak to connect to you LDAP. - Set the user password in
Bind credentials - Click on
Test authenticationto check credentials validty - Set the
Edit mode.READ_ONLYis usually what you want. - Set you user base dn in
Users DN. Exemple: CN=Administrateurs,DC=DR-CPT,DC=INTRADEF,DC=GOUV,DC=FR - Set the
Username LDAP attribute:uidorcnfor OpenLDAP,sAMAccountNamefor Active Directory. RDN LDAP attribute:cnUUID LDAP attribute:objectGUID- Set the
User object classesto match your configuration - You can either configure filter to select specific users in
User LDAP filter. Syntax is in the form of (memberOf=CN=YourGroup,OU=Users,DC=YourDomain,DC=com) - Set the
Search scopetoSubtree. Read timeout: leave emptyPagination:ONReferral:ignoreImport users:ONSync Registrations:OFF(Unless you want new users created by Keycloak added to your LDAP provider)Batch size: 1000Periodic full sync:OFFPeriodic changed users sync:OFFAllow Kerberos authentication:OFFUse Kerberos for password authentication:OFFCache policy:NO_CACHEEnable the LDAPv3 password modify extended operation:OFFValidate password policy:OFFTrust Email:OFF- Click on
Save
Configure groups
You may synchronize your groups to keycloak.
- Click on
User federation - Select your user federation
- Click on
Mapperson top of the settings panel - Click on
Add mapper - Set a name such as groups
- Select group-ldap-mapper
- Configure
LDAP Groups DN - Configure
Group Object Classes,Membership LDAP Attribute,Member-Of LDAP Attributeif needed - You may configure a filter to select specific groups in
LDAP Filter - Select a
Mode - Click on
Save
Add default group on user synchronization
This step will automatically assign a group to a user on synchronization. It will apply to all Users from the federation.
- Click on
User federation - Select your user federation
- Click on
Mapperson top of the settings panel - Click on
Add mapper - Set a name such as default-group
- Select hardcoded-ldap-group-mapper
- Configure
Group. The group must be first created. - Click on
Save
Configure Password Policy
Connect to keycloak and select the realm you want to configure:
- Click on
Authenticationin the left panel - Click on
Policies - Click on
Add Policyfor each parameter you may configureExpire PasswordNot Recently UsedMinimum LengthNot UsernameNot EmailNot Contains UsernameUppercase CharactersSpecial CharactersLowercase CharactersDigits
- Click on
Save
Configure Brute Force
Brute force mecanism enable you to lock accounts base on failed logins.
Connect to keycloak and select the realm you want to configure:
- Click on
Realm Settingsin the left panel - Click on
Security defenses - Click on
Brute force detection - In
Brute Force Mode, select Lockout permanently after temporary lockout - Configure
Max login failures - You may configure
Wait incrementMax waitFailure reset time
- Click on
Save
Add a new User
Check Keycloak Admin/Business LDAP Federation
Keycloak is configured to interface with LDAP to store users in two different LDAP organizations, depending on whether they are business or technical (admin) users.
By default, the business organization takes priority.
Before creating any user, you must therefore set the priority of the LDAP organization to be used for user creation.
The user's LDAP organization will no longer be modifiable afterward.
Go to the User Federation tab. The ldap_admin and ldap_metier federations are listed.
Click the Manage Priorities button, then move the relevant row to the top for user creation (e.g., if you want to create a System Administrator, you must move ldap_admin to the top).
Create a user
First you need to connect to the keycloak admin UI (console) :
- Select the realm
kosmosin the upper left corner - Click on
Usersin the left panel to show the user list - Click on the
Add userbutton - Configure the user :
- Toggle
Email verifiedasOn - provide the
Username/Email/First name/Last name - By clicking on the
Join Groupsbutton you can assign your user to one or more of the available groups in the realm - Finish the User creation by clicking on the
Createbutton
- Toggle
- After user creation you end up on your new user
User detailspage, click on theCredentialstab. - Click on the
Set passwordbutton :- fill the
PasswordandPassword confirmationfields - Leave the
Temporarytoggle asOnif you want the user to change their password on first connection, otherwise toggle it asOff.
- fill the
Assigning a Group
For technical users, assigning them a group is mandatory.
For business users, group assignment must be done in the GDA interface, on the business portal side, by a user with the necessary rights (an access administrator).
Click the Join Group button.
The page for selecting groups will appear:
-
Groups the user already belongs to are grayed out.
-
Other existing groups can be selected.
Select the group the user should belong to and then click Join.
A confirmation message will appear at the top of the screen.
Unassigning a Group
From the list of groups the user belongs to, located on the left side of the screen, select the group from which the user should be removed, and then click the "Leave" label located to the right of the selected group's row.
A confirmation request will appear: Are you sure you want to remove this user from this group? Click the red Leave button.
A confirmation message, "Removed group membership," will appear at the top of the screen.
Add a new Group
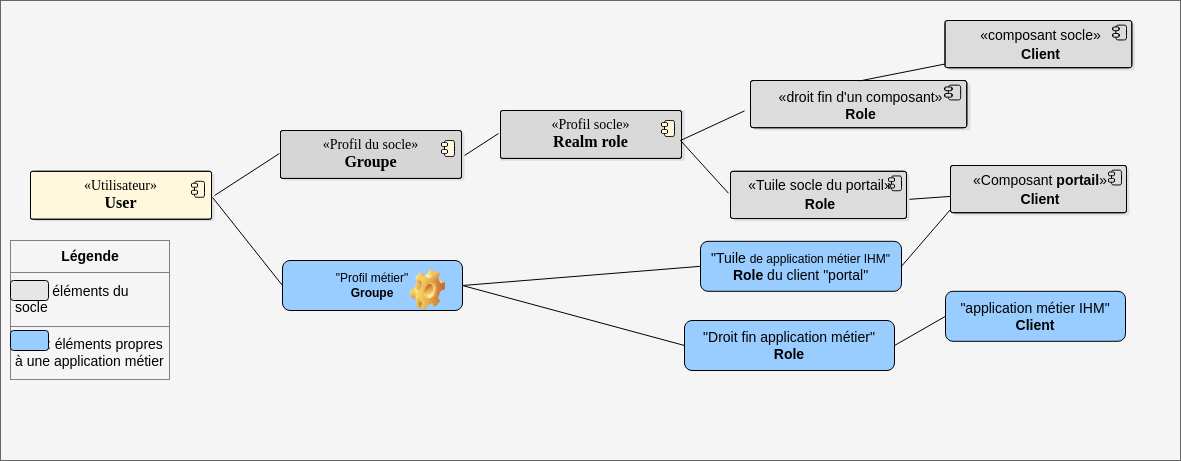
The infrastructure comes with predefined groups that grant permissions on the infrastructure components (core). It is recommended not to modify these groups.
To grant permissions on business applications to groups of users (from different business domains, for example), it is advisable to create a dedicated business group. This way, application permissions are granted to these business groups, to which the users will be assigned.
The diagram below illustrates this solution: the core elements that should not be modified are shown in gray, and the business elements are shown in blue.
The "client" and "roles" of an application can be automatically created during deployment. The business group is created according to this procedure. The assignment is described in the procedure Assign a Permission.
- Display the role list
On the home page, click the "Groups" option in the left-hand menu.
- Create a role
- Click "Create group"
- Enter the profile name
- Confirm by clicking "Save"
The message "Success! Group Created" confirms the successful creation of the profile.
Modify the role
The group can then be modified to:
- assign permissions to it
- define its parameters
See the procedure Assign a permission.
Roles for a business application deployed via SAP
When an application is deployed via SAP, two clients (KaName and KaName_priv) are created. If the application settings specified that clients should have multiple permissions, both clients will have these client roles.
For example, an application example-app might have the roles reader and writer. Therefore, in Keycloak, there will be two clients: example-app and example-app_priv. Furthermore, these two clients will have the roles reader and writer in their client roles. Thus, if you want to assign a user the role of reader, you must assign them the roles example-app reader and example-app_priv reader.
Why two Keycloak clients?
The user interface is protected by an OAuth2 reverse proxy. To function, this proxy requires a private client. Furthermore, it is from this private client that the JWT token is generated, which will then be transmitted to the backends of applications that request it (developer DTU, Application Exposure, Connect an application to the platform's SSO).
If the deployed application is a Single Page Application (SPA), meaning it doesn't have a backend, the JWT token cannot be transmitted to it. The application may still need the information from this JWT. To do so, it must communicate directly with Keycloak. However, Keycloak prohibits SPAs from using a private client for security reasons; therefore, a public client is required.
The deployment thus creates both clients, and it is up to the developer to decide how to use them (if they want to implement SSO): if their application is an SPA, they use the public client; otherwise, they read the data contained in the JWT transmitted by the OAuth2 reverse proxy.
Deleting a Group
Deleting a group in Keycloak has no effect because groups are replicated and then synchronized from LDAP (so they reappear ...).
Therefore, the deletion of a group must be done in LDAP using the Delete Group procedure, then in Keycloak: From the "Groups" menu, find and then delete the group.
Add a new Realm Role to the platform
First you need to connect to the keycloak admin UI (console) :
- Check that you're currently in the realm
kosmos. On the upper left corner, you must seekosmos Current realm. If not click onManage realmsbeneath it, thenkosmos. - Click on
Realm rolesin the left panel to display the list of realm roles. - Click on the
Create rolebutton. - Configure the realm role:
- Enter the name of the role.
- Optional: Add a description to outline what this role is supposed to represent.
- Click
Save.
Add realm role to user
First you need to connect to the keycloak admin UI (console) :
- Check that you're currently in the realm
kosmos. On the upper left corner, you must seekosmos Current realm. If not click onManage realmsbeneath it, thenkosmos. - Click on
Usersin the left panel to display the user list - Click on the user you want to modify.
- Go to
Role mappingtab. - Click on
Assign role. - Change the filter from
Filter by clientstoFilter by realm roles. - Tick the box corresponding to the realm role that you need to add or search for it.
- Click
Assign
Add realm role to group
When a permission is assigned to a group, all subgroups also inherit that permission.
Access permission to a GUI (portal tile) is represented by a role at the client level (portal) in Keycloak.
A permission within a component (specific permissions managed by each component) is represented by a realm role at the client level.
These specific permissions can be automatically created during the deployment of a GUI application if the GUI application has specified this.
First you need to connect to the keycloak admin UI (console) :
- Check that you're currently in the realm
kosmos. On the upper left corner, you must seekosmos Current realm. If not click onManage realmsbeneath it, thenkosmos. - Click on
Groupsin the left panel to display the list - Click on the group you want to modify or click on Edit option located to the right of the group's row to modify it.
- The group information entry page will be displayed. By default, the
Child Groupstab is displayed. - Go to
Role mappingtab. - Click on
Assign role. - Change the filter from
Filter by clientstoFilter by realm roles. - Tick the box corresponding to the realm role that you need to add or search for it.
- Click
Assign
If the group does not appear, click the 2nd View button (with a circular graph), located between the filter field and the blue Create Group button.
Add access to a portal's tile
Among the list of available Roles, with the Filter by client option:
- Search for roles that contain _IHM
Select the role(s) (which correspond to a portal tile) to assign to the group. The Assign button becomes available. Click on it.
A success message, Role mapping updated, appears, indicating that the role is associated with the group. The list of permissions is displayed in the Role mapping tab.
If this GUI application manages granular permissions, assigning the tile's role is not enough; you must also assign the granular permissions: see the next step.
Add granular permissions for an application or component (a Keycloak client)
Among the list of available Roles, with the Filter by client option:
- Search by the name of the client (corresponding to the component) in question.
Select the granular permission to assign. The Assign button becomes available. Click it.
A success message, Role mapping updated, appears, indicating that the client and their end role have been assigned.
Modifying the Multi-Session Policy
By default, a new user session is blocked. To change this behavior, you must:
- Access the Keycloak administration console
- Go to the
Authenticationmenu, thenkosmos-browser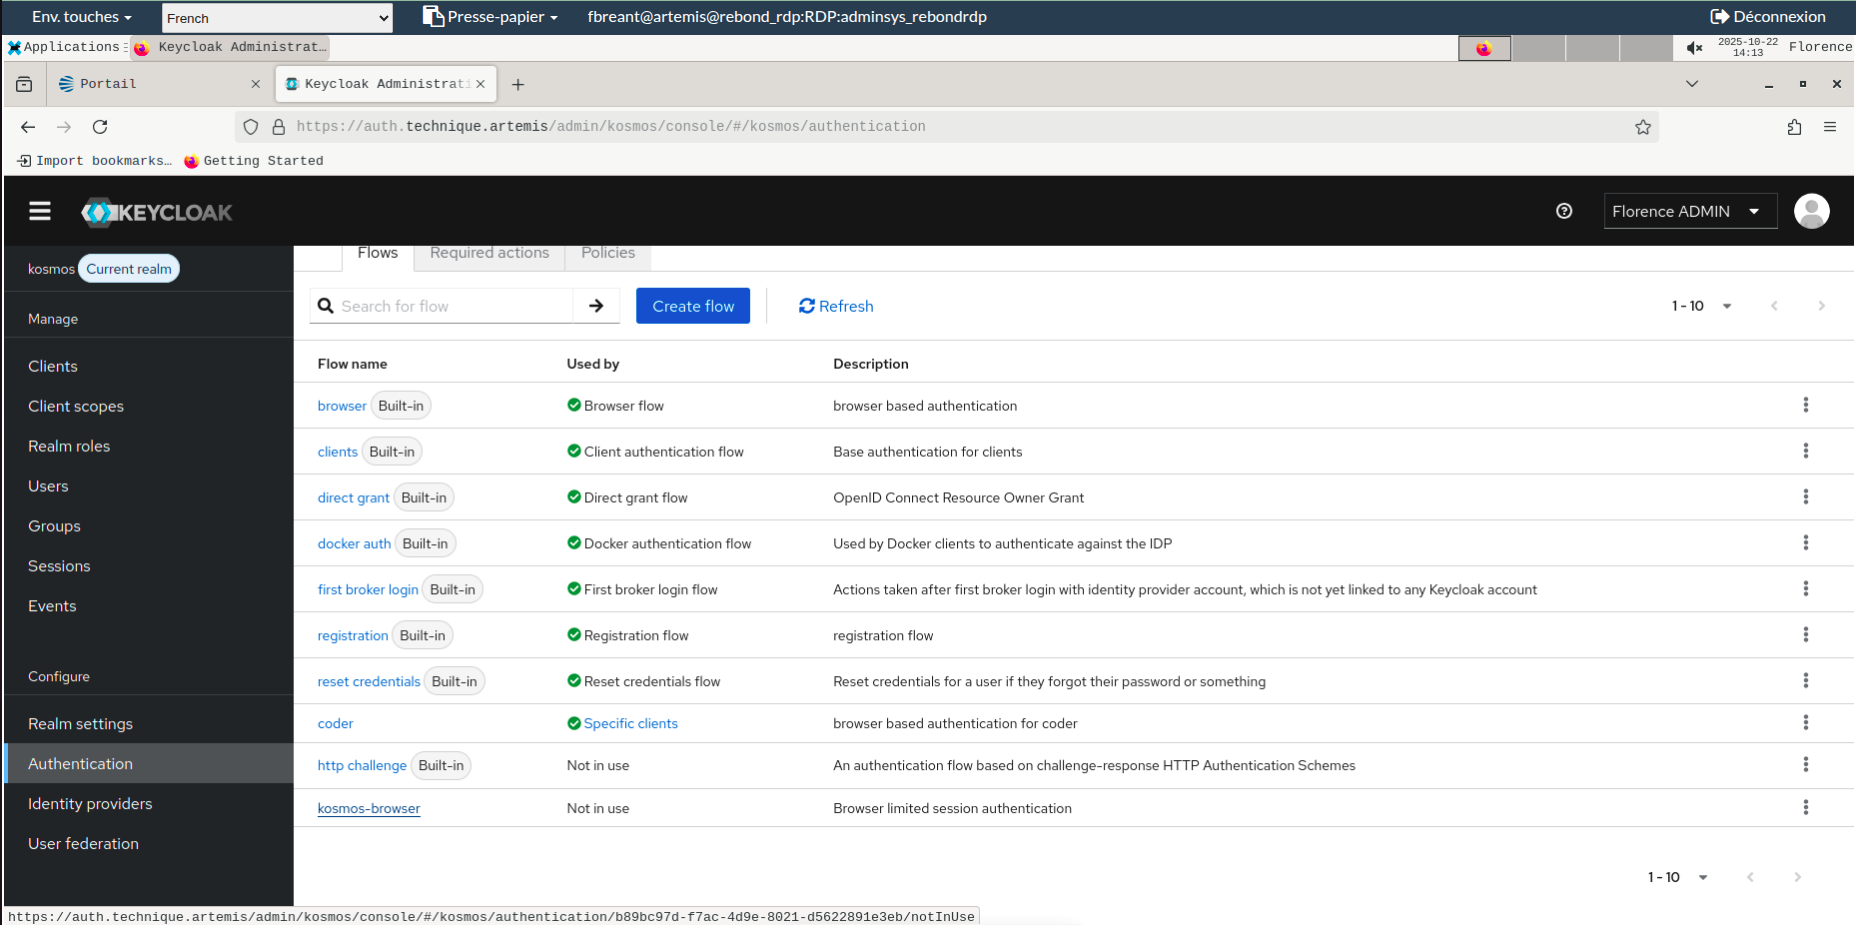
- Go to the settings for the
user count limiteroption and chooseterminate oldest sessioninstead ofdeny new session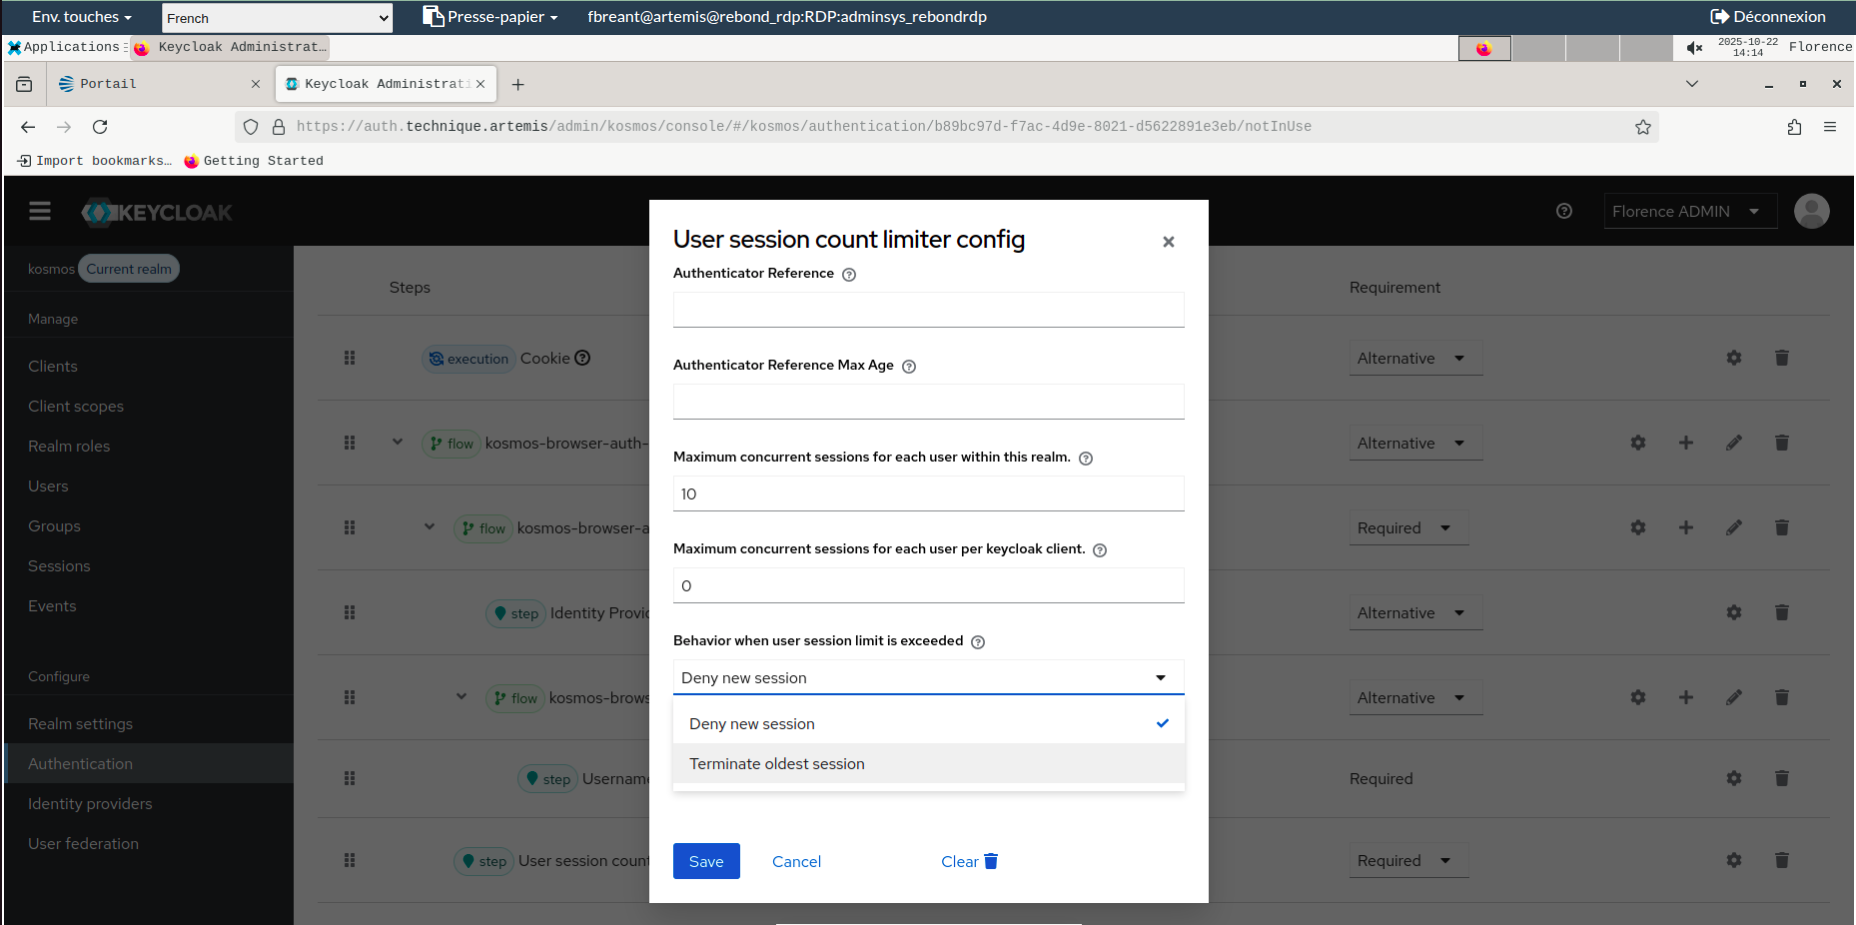
Technical information
Location
The component is deployed in the Kubernetes cluster.
The corresponding Kubernetes namespaces and pods are named:
- kosmos-iam
- redis-node-*
- keycloak-*
Each business application will have a sidecar pod -oauth2- added to its namespace to manage RBAC.
Initial Configuration
Sizing
The Keycloak pod is deployed with a replication factor of 3 by default; this can vary depending on the configuration. The resources for one pod are:
- Limits:
- CPU: 2
- Memory: 4GB
- Requests:
- CPU: 2
- Memory: 4GB
The Redis pods are part of a stateful set of 3 replicas.
Specific Configuration
Keycloak's configuration is stored in a database and the information is provided when the component is deployed:
| Name | Value |
|---|---|
| DB_VENDOR | "postgres" |
| JDBC_PARAMS | "connectTimeout=30" |
| DB_PORT | "pg.technique.artemis" |
| DB_PORT | "9999" |
| DB_DATABASE | DB_NAME |
| DB_USER | USER |
| DB_PASSWORD | PASSWORD |
Redis's configuration is stored in a configMap redis-configuration.
Key Files
Configuration Files
| Name | Path | Brief Description |
|---|---|---|
| standalone-ha.xml | /opt/jboss/keycloak/standalone/configuration | Keycloak global configuration |
| redis.conf | /opt/bitnami/redis/mounted-etc | Redis configuration |
| sentinel.conf | /opt/bitnami/redis/mounted-etc | Sentinel service configuration |
Logs
Logs are redirected to the standard output of the Pods. They are retrieved by the log collection chain. They are also directly accessible within the pod. Software documentation: https://www.keycloak.org/server/logging
Binaries
Certificates for HTTPS communication are managed at the Kubernetes level on the Ingress servers.
To enable LDAP communication, a truststore.jks file in the form of a configmap is attached to the pod and contains the platform's certificate chain.
Failure Combination
If the PostgreSQL database is unavailable, the Keycloak component stops working. For the OAuth2 proxy, ephemeral session storage is performed in the /data directory provided by a Persistent Volume. If the Persistent Volume is unavailable, the Redis pod crashes or cannot be deployed.